Storage
Clone a Hard Drive or SSD
Please note: When installing Version 11.5, you will likely get a pop-out notification from Windows Security reporting a threat (low) “PUABundler-Win32/FusionCore” or “Browser Modifier” or something similar. This is not a problem, you can ignore it and proceed or remove it and proceed, it really doesn’t matter. This happens because Windows Security sees that the app may include 3rd party offers, meaning it may try to install unwanted software after installing the Minitool Partition Wizard. Just pay attention at the end of the installation if it prompts you to install additional software just ignore or uncheck the option, or close the installation, the actual app would have already been fully installed at this point.
The rest of this tutorial will be based on the 10.0 and 11.5 versions.
After downloading, run the installation file by double-clicking. Select your preferred language and hit ok.

Accept the license terms and hit next on the following pages.


Here, choose whether or not you want to create a desktop shortcut and if you want to participate in the customer experience improvement program, then hit next.

On this next window, it asks if you want to install additional software. If you don’t, simply uncheck the box where it says “I have read the Privacy Notice…” and then hit next to continue with the normal installation.

On the window that follows, hit install.

and hit finish to complete the process.

Before the next step, connect your new disk or SSD to the laptop using the USB SATA Adapter cable as shown below. If you have a USB 3.0 port, then you should definitely use it, this will fasten the process substantially compared to a USB 2.0 port.
On the page below, choose Disk Clone

It should take you to this copy disk wizard. Here hit next.

On the next page, it asks you to Select Disk to copy. Here, by default, your C drive labeled Disk 1 is selected. If for some reason this is not the drive you want to copy, then select the drive you want to copy and hit next.

On the next page, it asks you to select the Target Disk, which in this case is the new 240 GB SSD I want to upgrade to.

Here check that this is the disk you want to upgrade to, especially if you have more than one secondary disks attached to your computer, then hit next.
It then reminds you that all the data on the destination disk will be destroyed, are you sure you want to continue? Here double-check that you have selected the right disk before hitting Yes.

On the next screen, you will see a summary of all your selections. By default, Fit partition to entire disk is selected and Disk 2 is the target disk, which is my SSD. If that’s right for you, click next.

It then informs you to configure your BIOS to boot from the destination disk when next you boot up, I will explain this a bit later, just click finish.

Next, it returns you to this main page below where you will now click apply on the top right corner to begin the migration process.

A note will pop out recommending that you close all applications before applying the changes.

Here close down any application running and hit Yes to start the migration process. If you get past this stage then just wait for the migration process to run as supposed.

However, oftentimes you will get this notice saying “Operation copy partition cannot be completed because drive C is being used now”.

It’s okay to get this notice, mainly because some background processes running on your laptop make your drive C appear busy for the process to run, so it offers you three options, you either restart, retry or cancel the process. Here click on Restart Now and then wait for the partition wizard to automatically perform the migration process upon restarting.

This process will take a while depending on the amount of data you have on your hard disk and the performance of your laptop. With a higher performance laptop in terms of processor and RAM, this process could be a lot faster.
As shown above, is important to have your computer powered on the whole time, so use your AC adapter if necessary.
When the migration process is complete, proceed to the final process which is the actual swapping of the old disk (HDD or SSD) with the new disk (HDD or SSD). Before that, here are two important warnings.
-
First, we had a note to configure the BIOS to boot from the destination disk when next we boot up, here’s what that implies. Most likely your default BIOS settings is to boot up from your main drive which is drive C, so if you are replacing your hard disk with an SSD or one SSD with another, then you don’t have to change your BIOS settings, it will automatically boot from the drive it finds attached to your main disk connector.
-
The second thing is the issue of activation or a Windows license. First, let’s understand what the disk migration implies, it basically means you have successfully copied your Windows to another drive, so you have the same copy of Windows on two separate drives both activated with the same digital license. This does not imply that you can run the two copies of Windows on two separate machines. They might run successfully, however, your Windows license is attached to your laptop, so attaching any of the two drives to some other laptop could violate the license terms of your Windows, hence you will end up with an unlicensed Windows.
Depending on the type of license you have, you might even lose the license on your main laptop if you use your drive on another laptop and return it back to your laptop, so to preserve your Windows license, only run these drives on your main laptop.
To swap the old SSD with the new one, first shut down the laptop, then remove the SATA adapter from the laptop and the SSD. Locate your hard drive compartment, most laptops would have it underneath.
Carefully unscrew to uncover the hard drive, remove and replace the hard disk with the new SSD or HDD, tighten back all loose screws and then you’re good to go.
Power on your laptop normally, and it will boot straight into the new SSD or HDD. You will observe from your desktop that all files and folders are exactly as you had them on the old disk. All the settings, including the Wi-Fi credentials, are preserved.
Also if you check your Windows activation status, it should say that Windows is activated with a digital license which means you have successfully transferred your entire system from the old SSD to a new SSD without having to install Windows again and without losing any files, applications or settings.
Clone Your System\Windows Drive Using DiskGenius
As you probably know, we usehard drives in computersto store our files, install our programs on and also to run our operating system (Windows, Linux, macOS etc.). But sometimes we end up using too much space on our drives and need to either delete files tofree up spaceor move them to another drive, or even expand our drive if we have any unallocated space available.
Watch Video:How to Clone Your System\Windows Drive for Free Using DiskGenius.
You may also run into a situation where your hard drive is failing, and you want to migrate\copy your operating system drive with its installed programs to a new drive or maybe even a larger drive to give you more space in the future. In this article, we will be showing you how to clone your system\Windows drive for free using DiskGenius.
DiskGenius Usage
DiskGenius is a hard drive management tool that has many features such as the ability to clone disks and partitions, manage drives, edit sectors, recover data and more. They have a free version as well as a Standard and Professional version, each with additional features. We will be using the free version for our demonstration.
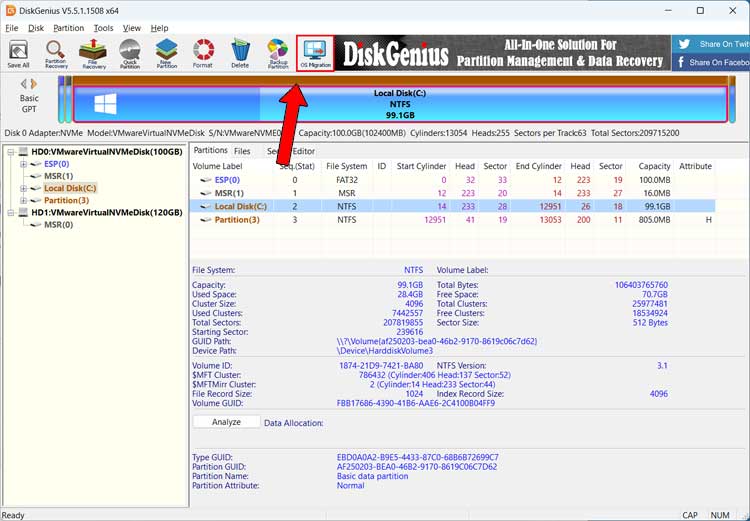
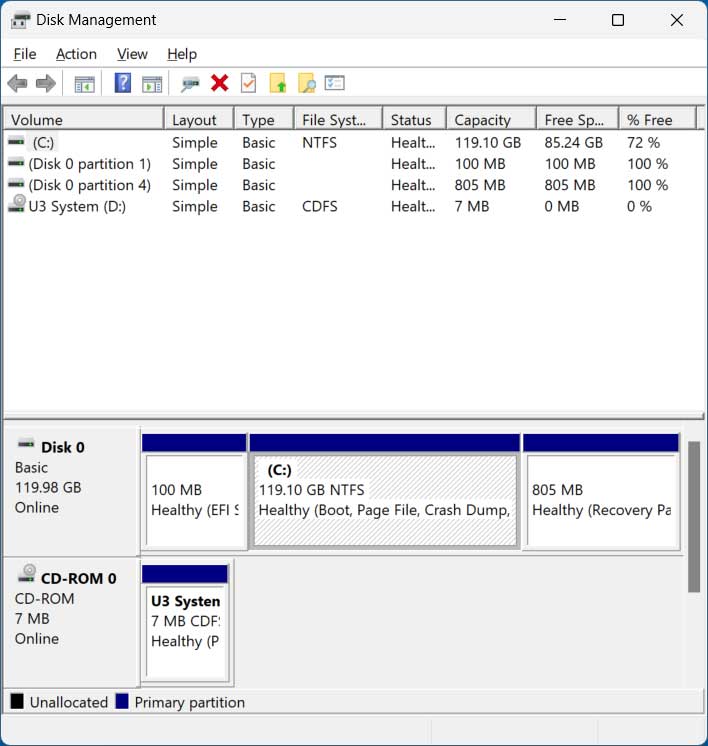
If you openDisk Managementin Windows, you can see the details about your hard drives and any attached external drives. As you can see in the image below, we have a 100GB system drive that has Windows installed as well as a new 120GB drive with no volumes\partitions created. We will be cloning the 100GB to the 120GB drive for our demonstration.

When you install DiskGenius, you will get a warning telling you that you should not install it on a partition where you want to recover files, but this does not apply to the cloning process we will be performing so installing it on the Windows drive will be fine.

Using DiskGenius to Clone your System\Windows Drive
When you first open DiskGenius, you will see that there are many things you can do with the software. You want to make sure you go toOS Migrationrather than just cloning a drive or partition so that way it makes the cloned drive bootable so you can start your computer with it.
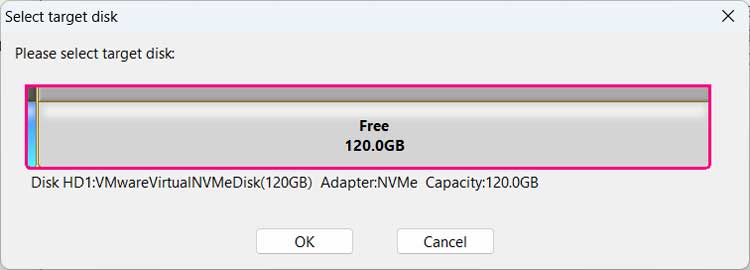
Next you will need to select the target disk. It should show you your new blank disk by default, but you need to make sure that it has chosen the correct one. The target disk is the one that will be wiped and where your OS files will be copied to.
The source disk should be chosen automatically since it’s the one that is running Windows. There are a couple of options at the bottom that you can try but whether they work or not will depend on your computer.
You can have DiskGenius try and change the boot order of your computer so it boots from the new drive first, that is if you are leaving the old drive in the computer and not removing it. You can also have it try to boot to the BIOS so you can manually change the boot order yourself. We will be removing the old drive before booting the computer with the new drive so we will not select any of these options since we need to shut down the computer to remove the old drive.
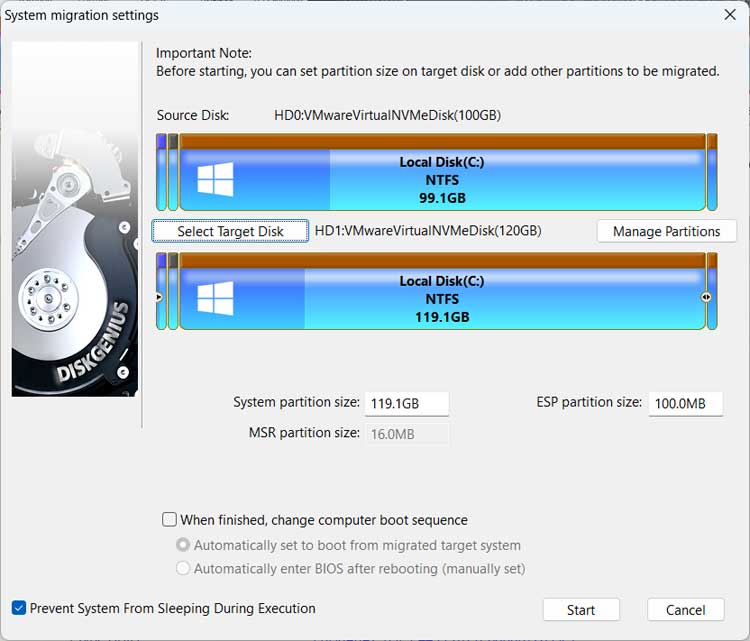
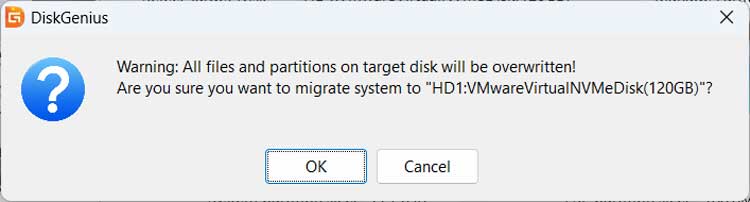
Once you click theStartbutton, you will be given a warning saying all the partitions on the target disk will be overwritten and you will need to clickOKto continue.
You then have the option to boot into theWinPEenvironment or use theHot Migrationoption to clone the disk while Windows is running.
WinPE (Windows Preinstallation Environment) is a lightweight operating system environment from designed for system deployment, recovery, and troubleshooting tasks. It provides a minimalistic yet functional Windows environment that can be booted from various media, such as USB drives or network shares, allowing users to perform tasks such as installing or repairing Windows, partitioning disks, running diagnostic utilities, and accessing network resources.
We will be using the Hot Migration option for our example.

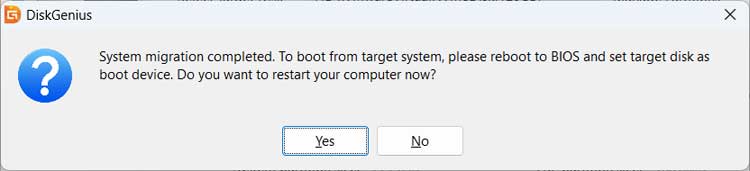
When the cloning process is complete, you will get a message asking if you want to restart your computer now. If you plan on removing the old drive, you should click onNoand shut down instead.
After removing the old drive and making sure the new 120GB drive is configured to be the first boot device, we can then load Windows and see that our new 120GB is now the C drive or system drive and the old 100GB drive has been removed.
As you can see, it is fairly easy to clone your system\Windows drive using DiskGenius. You can download DiskGenius from their website here.